Wow! There are no words that can really describe how much fun convention was. Dave's uncle asked me about it, and said he was glad I had fun, but he "just didn't get it." Here is a short video that showcases just a tiny bit of the magic we had at our convention this year. & if you look close enough, you will see me and my friends Desiree and Denise. (look for the Cricut box... Desiree won a Cricut!!!)
If this looks amazing to you too, think about joining me at convention next summer in Dallas, TX!
Saturday, July 23, 2011


Friday, July 22, 2011
I'm back from convention!
Last week I was at the Happiest Place on Earth with some of my favorite people! Our Close to my Heart convention was the BEST EVER! Here is a short video with a sneek peek of our newest product!!!!! Be sure to contact me to see this in person, or even better - order yours from me!
Friday, May 27, 2011
studio j is so much fun!
Close to my Heart is pretty much the best! Here is another great video to show you some awesome tricks.
I am super excited about Studio J! Have you tried it yet?
There are only a few more days to get in on the AMAZING special!!!!
Did I mention that we have the most awesome deal during May? You don't want to miss out!
Click here to sign up!
I am super excited about Studio J! Have you tried it yet?
There are only a few more days to get in on the AMAZING special!!!!
Did I mention that we have the most awesome deal during May? You don't want to miss out!
Click here to sign up!
Sunday, May 22, 2011
A successful crop, Super-cute new journal, & only 9 more days to get in on the CTMH special!
Yesterday was my May crop. We had so much fun, a delightful Asian Chicken salad with fresh homemade bread, tons of free-play, an abundance of candy, and great company! If you missed the crop yesterday, you won’t want to miss the next one on June 25th! (only $35… It’s a sweet deal!)  During my crop, I was able to work on something for myself. I made this darling My Creations Journal using left over’s and the awesome stamp set from the fantastic You & Me kit! My favorite part is the super-cute stacked buttons! I am totally in love with button stacking right now!
I saw this video for a cute smash book and I thought, coolio, I can totally make that with one of our My Creations Journals! I can just add a Bonding Memories glue pen and a cute marker or pen to journal with, and slam-bam -> my own super easy DIY smoosh-book!
 Share the pics of your own DIY smoosh-book with me! I’d love to see what else can be done!
And last, but probably the most important part of this post…
There are only 9 more days left to take advantage of the unbelievable special with Close to my Heart this month!!! That’s right… you really can’t afford to miss out on this killer deal!!!!
 I am super thrilled that I have already had such a fantastic response! Kim, Leslie, Patty & Karla have already taken advantage of this awesome opportunity! Will you be next?
Now’s the Time!
Join the Close To My Heart family during May and get the new Consultant Kit at 50% off!
Have you ever thought: “I really need to catch up on my scrapbooking.”?
Have I got a deal for you! May is National Scrapbooking Month and Close to my Heart is offering a special so amazing you and your friends will all want to jump at the chance to snap it up!
This month you can get a 1 year Studio J membership (worth $99), a Free National Scrapbooking Month kit (worth $34.95) Plus 2 additional scrapbooking kits of your choice for only $64.50. That’s over $300 worth of CTMH for just $64.50!!!! Then, receive a 22% discount on all your Close to my heart purchases including your Studio J layouts for the next 4 months! I told you it was an amazing deal! So, what’s the catch??? Are you afraid of selling stuff??? Guess what: you don’t have to sell anything. If you like scrapbooking, you can be your own best customer. & ordering your own Studio J layouts count!!! Sound good? Click here to get started, or contact me right away and I’ll be happy to help answer any questions you have! Seriously, this deal rocks! & if you have an extra $89.50 (that is with tax and shipping) hanging around, you will not want to miss this offer!!!!
Contact me today to find out more!!! :)

I saw this video for a cute smash book and I thought, coolio, I can totally make that with one of our My Creations Journals! I can just add a Bonding Memories glue pen and a cute marker or pen to journal with, and slam-bam -> my own super easy DIY smoosh-book!

And last, but probably the most important part of this post…
There are only 9 more days left to take advantage of the unbelievable special with Close to my Heart this month!!! That’s right… you really can’t afford to miss out on this killer deal!!!!

Now’s the Time!
Join the Close To My Heart family during May and get the new Consultant Kit at 50% off!
Have you ever thought: “I really need to catch up on my scrapbooking.”?
Have I got a deal for you! May is National Scrapbooking Month and Close to my Heart is offering a special so amazing you and your friends will all want to jump at the chance to snap it up!
This month you can get a 1 year Studio J membership (worth $99), a Free National Scrapbooking Month kit (worth $34.95) Plus 2 additional scrapbooking kits of your choice for only $64.50. That’s over $300 worth of CTMH for just $64.50!!!! Then, receive a 22% discount on all your Close to my heart purchases including your Studio J layouts for the next 4 months! I told you it was an amazing deal! So, what’s the catch??? Are you afraid of selling stuff??? Guess what: you don’t have to sell anything. If you like scrapbooking, you can be your own best customer. & ordering your own Studio J layouts count!!! Sound good? Click here to get started, or contact me right away and I’ll be happy to help answer any questions you have! Seriously, this deal rocks! & if you have an extra $89.50 (that is with tax and shipping) hanging around, you will not want to miss this offer!!!!
Contact me today to find out more!!! :)
Saturday, May 14, 2011
Starr’s Famous Cookies
Yesterday I posted about the "better for you cookies" and that was pretty fun but no one in my family liked them. So, today, because we are actually not going on our beach trip after all, and I got to stay home and try to keep my mind off the fact that the dog bit Harry in the face and he is at the ER with his Dad & Jordie, I decided to make *my* cookies.

(I swear, I was gonna make them and post about them sometime soon... I just wasn't planning on it so soon.)
I have had this recipe for years! I got it from Tabitha or Wendy Towne, like 15 years ago. It started as the "Neiman Marcus Cookie Recipe" and over the years I have kind of perfected it. (like, I don't use the grated candy bar like the original recipe calls for)
Today I tried to do my usual "dabbling" and forgot that I needed to follow the recipe exactly. So, these cookies, although not dry, are a little stiff. I switched the amounts of flour and oatmeal today. *don't do that when you make these*
These are my families favorite and are the cookies that we sell to raise money for Tender Loving Christmas, and that we give away to our friends and loved ones. Enjoy!
Here we go:
Starr’s Famous Cookies
• 2 cups butter
• 2 cups sugar
• 2 cups brown sugar
• 4 eggs
• 2 tsp. vanilla
• 1 tsp. salt
• 2 tsp. baking soda
• 2 tsp baking powder
• 5 cups oatmeal (blended)
• 4 cups flour
• 24 oz. chocolate chips
• 3 cups chopped nuts (your choice, I love pecans)

Measure oatmeal and blend in a blender (or food processor) to a fine powder.


Cream the butter and both sugars. Add eggs and vanilla; mix together with flour, oatmeal, salt, baking powder, and soda. Add chocolate chips and nuts. Roll into balls and place two inches apart on a cookie sheet.


(was dalin helping or testing?)
Bake for 12 minutes at 375 degrees. Makes 112 cookies.
(Recipe may be halved)

Here is Max helping out. He feels guilty.
Here are the finished cookies:

Here is Harry, before the incident, with our other dog, Korndawg.
Korn would never try to eat Harry, but he sure does like to try and steal cookies off the counter ;)

Friday, May 13, 2011
I sure do love Studio J
Here is a fun video showing how easy Studio J is! :)
PS: did I mention that you can get your own Studio J membership, plus a boodle of other great CTMH for just $64.50 in May??? Just checking. Click here to sign up!
PS: did I mention that you can get your own Studio J membership, plus a boodle of other great CTMH for just $64.50 in May??? Just checking. Click here to sign up!
Better- for - you Chocolate Chip Cookies
Anyone who knows me, knows that I just LOVE to bake! Now, I haven't been to culinary school, like other people in my family. I just enjoy dabbling. Dave has to remind me often that baking and cooking are two separate and distinct forms of making food. With cooking one can easily add a pinch of something here, and a dash of something else there.
While baking is a form of chemistry.
And since I like to do my own thing waaay to much, I sometimes discover lots of ways to not do something. lol.
This morning the mailman delivered 2 boxes from QVC. I don't shop there, but I know someone who does. So these boxes were a treat and surprise. One box had a George Forman type omelet maker in it, and the other contained a fun looking cook book. Eat What You Love, by Marlene Koch. It is a cookbook with lots of supposedly delightful dishes, with all the taste you are hoping for without the fat, sugar & calories you would expect.

& since I am in the mood for chocolate... and the cookies on the cover looked good to me, I decided to give them a try. Here are a few rules I gave myself:
1. follow the instructions exactly
2. follow the instructions exactly
3. follow the instructions exactly
(cause you know, I like to dabble, and change things up a bit. and then it never fails... I just don't like that recipe. Never mind that I didn't actually make that recipe.)
So, with those simple rules, I set to work whipping up these cookies.

First I called my mom to thank her for the book. (that took an hour and 11 mins.) Then I looked for the recipe shown on the cover of the book. Surprisingly, there are not as many pictures in here as I expected. I found the green "classic cookies and cake" section in the back of the book and got to work.
The recipe calls for a large bowl, so then I had to actually *read* the recipe to decide exactly how big this bowl needed to be. I decided the 2 qt pampered chef mixing bowl would do the job. I got my butter out and about that time, decided to blog it, so I had to set up a quick photo-shoot.

Here is Max helping me out:

* I will note here that it probably won't take all day for you to make these cookies, since you may not need to stop to call your mom and then set up a photo shoot just to make these. And as I write this, the cookies are cooling on the counter, and I have not tested them, so I don't know how this is going to turn out.
Ok, so on to the cookie making:
Better-For-You Chocolate Chip Cookies by Marlene Koch
Nutritional Info
• Fat: 4.7g
• Carbohydrates: 11.9g
• Calories: 93.0
• Protein: 14.7g
Ingredients
1 Cup All purpose Flour
1/2 Cup white whole wheat Flour
3/4 tsp Baking Soda
1/2 cup Butter, softened
1/4 cup Dark Brown Sugar
1/4 Granulated Sugar
1/4 Splenda Granulated Sugar (I used Stater Bros brand)
1 1/2 tsp. Vanilla Extract
1 Large Egg
1/2 cup mini-chocolate chips
1/4 cup chopped Pecans or walnuts
chips
Directions
1. Preheat oven to 375 degrees F. Spray cookie sheet with non-stick cooking spray.
2. In a small bowl, combine the all-purpose flour, white whole wheat flour, and baking soda.
3. In a large bowl, with an electric mixer, beat the butter, sugars, and sweetener until very light and creamy. Beat in the vanilla and egg. Add the flour mixture and beat just until blended. Stir in the chocolate chips and nuts.
4. drop the dough by level tablespoons onto a baking sheet 2 inches apart.

Flatten the cookies by pressing down on the dough with a spatula or the bottom of a glass.

5. Bake for 7 to 9 minutes, or until lightly browned and set.
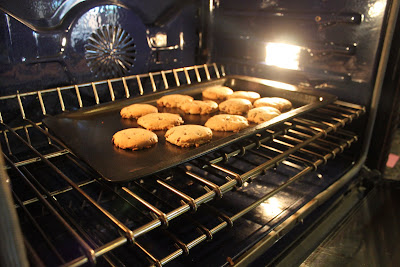
Cool on the baking sheet until firm. Remove to wire racks to finish cooling.

I did actually cool them on a wire rack!!! I did! I promise. (I just didn't get a shot of that, so this is a pic of the foil set)
Number of Servings: 28
Ok, so... my first thoughts were
* no salt?
* this is waaaaayyy smaller than what I usually make. I wonder if it is because it isn't yummy and this is the "try me" batch, to know not to make them again.
*Why do I need to spray the cookie sheet with Pam????
* the raw cookie dough has a good "flour" flavor, with a slight "splenda" bite to it.
* the wet mixture from the beaters = tasty :)
I used the mixer to mix in the wet ingredients, but folded in the dry with a spoon.

The whole "1 level teaspoon" thing was bugging me, (and totally time consuming) so I did the second pan with the handy-dandy pampered chef cookie scoop; because I didn't outfit my kitchen with these amazing gadgets for nothing!
I have never smooshed a cookie with a glass bottom before, so that was a first.

The instructions say to bake for 7-9 mins, so I kept them in for 8 mins.
When I took the cookies off the "sprayed" pan, I still didn't get it. But when I took the second (rebel) batch off the other pan covered in tin foil and no spray, I could see bits of leftover cookie on the foil still. (so maybe the author knew what she was talking about)

I let the cookies cool while I typed this up.
taste:
good!
light & fluffy
a bit dry
cant really notice the splenda
cant really notice the butter either
not my normal cookie!
dont need to spray pan!
I would probably make these again, just not for the fam.
(however, I know my family will notice that these are not MY cookies!)

*Jordan says "they are not as good as your cookies. too dry, too crunchy. not as good as yours. & they are too dry"
Dalin says "too small, taste funny"
* this took waaaayyy too much time to make/blog about. but it was kinda fun.
So, my faithful readers, let me know what you think. Give them a try and post your results here. :)
While baking is a form of chemistry.
And since I like to do my own thing waaay to much, I sometimes discover lots of ways to not do something. lol.
This morning the mailman delivered 2 boxes from QVC. I don't shop there, but I know someone who does. So these boxes were a treat and surprise. One box had a George Forman type omelet maker in it, and the other contained a fun looking cook book. Eat What You Love, by Marlene Koch. It is a cookbook with lots of supposedly delightful dishes, with all the taste you are hoping for without the fat, sugar & calories you would expect.

& since I am in the mood for chocolate... and the cookies on the cover looked good to me, I decided to give them a try. Here are a few rules I gave myself:
1. follow the instructions exactly
2. follow the instructions exactly
3. follow the instructions exactly
(cause you know, I like to dabble, and change things up a bit. and then it never fails... I just don't like that recipe. Never mind that I didn't actually make that recipe.)
So, with those simple rules, I set to work whipping up these cookies.

First I called my mom to thank her for the book. (that took an hour and 11 mins.) Then I looked for the recipe shown on the cover of the book. Surprisingly, there are not as many pictures in here as I expected. I found the green "classic cookies and cake" section in the back of the book and got to work.
The recipe calls for a large bowl, so then I had to actually *read* the recipe to decide exactly how big this bowl needed to be. I decided the 2 qt pampered chef mixing bowl would do the job. I got my butter out and about that time, decided to blog it, so I had to set up a quick photo-shoot.

Here is Max helping me out:

* I will note here that it probably won't take all day for you to make these cookies, since you may not need to stop to call your mom and then set up a photo shoot just to make these. And as I write this, the cookies are cooling on the counter, and I have not tested them, so I don't know how this is going to turn out.
Ok, so on to the cookie making:
Better-For-You Chocolate Chip Cookies by Marlene Koch
Nutritional Info
• Fat: 4.7g
• Carbohydrates: 11.9g
• Calories: 93.0
• Protein: 14.7g
Ingredients
1 Cup All purpose Flour
1/2 Cup white whole wheat Flour
3/4 tsp Baking Soda
1/2 cup Butter, softened
1/4 cup Dark Brown Sugar
1/4 Granulated Sugar
1/4 Splenda Granulated Sugar (I used Stater Bros brand)
1 1/2 tsp. Vanilla Extract
1 Large Egg
1/2 cup mini-chocolate chips
1/4 cup chopped Pecans or walnuts
chips
Directions
1. Preheat oven to 375 degrees F. Spray cookie sheet with non-stick cooking spray.
2. In a small bowl, combine the all-purpose flour, white whole wheat flour, and baking soda.
3. In a large bowl, with an electric mixer, beat the butter, sugars, and sweetener until very light and creamy. Beat in the vanilla and egg. Add the flour mixture and beat just until blended. Stir in the chocolate chips and nuts.
4. drop the dough by level tablespoons onto a baking sheet 2 inches apart.

Flatten the cookies by pressing down on the dough with a spatula or the bottom of a glass.

5. Bake for 7 to 9 minutes, or until lightly browned and set.

Cool on the baking sheet until firm. Remove to wire racks to finish cooling.

I did actually cool them on a wire rack!!! I did! I promise. (I just didn't get a shot of that, so this is a pic of the foil set)
Number of Servings: 28
Ok, so... my first thoughts were
* no salt?
* this is waaaaayyy smaller than what I usually make. I wonder if it is because it isn't yummy and this is the "try me" batch, to know not to make them again.
*Why do I need to spray the cookie sheet with Pam????
* the raw cookie dough has a good "flour" flavor, with a slight "splenda" bite to it.
* the wet mixture from the beaters = tasty :)
I used the mixer to mix in the wet ingredients, but folded in the dry with a spoon.

The whole "1 level teaspoon" thing was bugging me, (and totally time consuming) so I did the second pan with the handy-dandy pampered chef cookie scoop; because I didn't outfit my kitchen with these amazing gadgets for nothing!
I have never smooshed a cookie with a glass bottom before, so that was a first.

The instructions say to bake for 7-9 mins, so I kept them in for 8 mins.
When I took the cookies off the "sprayed" pan, I still didn't get it. But when I took the second (rebel) batch off the other pan covered in tin foil and no spray, I could see bits of leftover cookie on the foil still. (so maybe the author knew what she was talking about)

I let the cookies cool while I typed this up.
taste:
good!
light & fluffy
a bit dry
cant really notice the splenda
cant really notice the butter either
not my normal cookie!
dont need to spray pan!
I would probably make these again, just not for the fam.
(however, I know my family will notice that these are not MY cookies!)

Dalin says "too small, taste funny"
* this took waaaayyy too much time to make/blog about. but it was kinda fun.
So, my faithful readers, let me know what you think. Give them a try and post your results here. :)
Subscribe to:
Posts (Atom)